
Leeds UK USDA: 9a (a measure of hardiness and temperature range)
- I used a map zooming on Chapel-Allerton and gave 9a
- As a general rule, the UK is marked primarily by cool (but not frigid) winters and warm (but not scorching) summers. The UK enjoys a fairly long frost-free season that extends from early spring to late autumn.
- USDA (U.S. Department of Agriculture)
We have 23 (18x mRBs and 5x uRBs (~27.5 sqm):
- 18 miniRBs (mRBs):
- 16x (4*4) mRBs from RB1-4 and RBx:y (1.44sqm, 1.2mx1.2m)
- 2x RBs 7-8 (1.12sqm, 70x160) (1.26sqm, 70x180)
- 5 microRBs (uRBs):
- 1xuRB RB9 (0.84sqm, 70x120)
- 2xuRBs 5-6 (0.61sqm, 49x125) (0.56sqm, 43x130)
- 2x uRBs 10-11 (0.5sqm, 50x100) (0.65sqm, 50x130)
- Notes for RB4:x [1-4]
- RB4:1-3: 1.25x0.98 (1.23sqm) , 1.23x0.94 (1.16sqm), 1.11x0.94 (1.04sqm)
- RB4:4: 150x94 (1.21sqm) (trapezoid shape)
- (L1+L2:35+115) (sides H1/H2:94/60)
- 121sqm~ (150*94) - (1.15*0.34): The triangle part to remove (115x(94-60))/2
Total RBs area: 27.5 sqm
∆ ± ℃
Triple decker RB2 - Useful as
- Cold frame in RBs: Now that I have a 3d (triple decker) in RB2:1-4, it can easily serve as a cold frame in Feb-April time to store trays of germinated seed trays using the corrugated PVC as cover. I have done that on 12/03/22 by taking a few trays there as an experiment.
- Plant seedlings requiring cover & heat (given the third deck can cover these simply with corrugated pvc panels.
- For all year round, in particular over winter or early spring
- DF beans needs to be pre-germinated ya dindou!
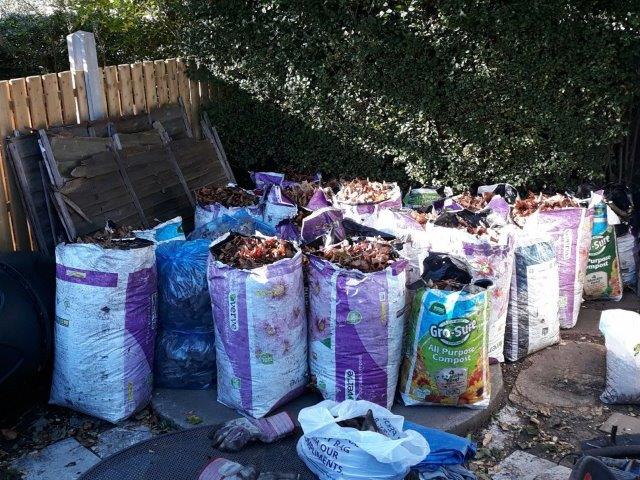
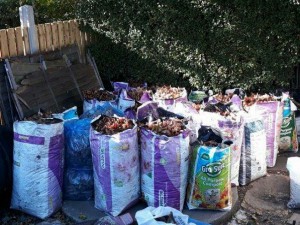
14/07/23 List of items for hedges (boxwood trimmings (external IW)
|
|
30/06/23
- Plant broadbeans for nitrogen nutrient retainer in the soil: You plant them e.g. over winter, once they reach a certain size, you cut the top for compost and leave roots for Nitrogen retainer in soil (small white particles) (Charles Dowding youtube and DaveG)
- Remember to remove top tips of broadbeans, else black flies can do quite some damage; it did in 2023!
Main ingredients, constituents, components
21/02/23 Handy table for RB planting; when planting seeds or transplanting seedlings.
- Work out the number of seeds you want in your RB in NxN and do a look up for the Gap (cm) between each plant
- For example , 5x5 (25 stations) and the gap is 20cm.
- You can augment any 5x5 to a 7x7 by planting one of the seeds/seedlings on the edge.
|
For an RB (raised bed) 120x120cm |
||
|
plant layout |
#space |
Gap (cm) |
|
3x3 |
4 |
30 |
|
4x4 |
5 |
24 |
|
5x5 |
6 |
20 |
|
6x6 |
7 |
17 |
|
7x7 |
8 |
15 |
|
8x8 |
9 |
13 |
|
9x9 |
10 |
12 |
|
10x10 |
11 |
11 |
|
11x11 |
12 |
10 |
22/12/22 soil improvers & plant food ( bags) - categories
- Plant food: growmore, woodash, potash; 18-18-18;
- Soil improver: lime, gypsum, sand, charcoal;
- compost mix: coffee grounds, shredded cardboard; (lime, woodash, charcoal)
- pot layout: chopped woodsticks, moss/mesh, stones
26/07/22 Overall garden measurement/space
Approx NET soil planted/plantable area: 96 sqm
- Grass area ~55 sqm (57%)
- RBs area: ~28 sqm (30%)
- Borders row: ~13 sqm (13%) (excluding RBs)
- Borders row: ~16 sqm (17%) (including RBs)
- Overall garden (plantable) space
- Back area (omitting terrace & marbles area):
- 7.80m (width) by (8.40 (grass area) + 4.80 (RBs area)) = 102.96 sqm
- 7.80(w) x 13.2=13.2*7.8(l) =102.96 sqm
- Front RBs: 4.80mx1m = 4.80sqm
- So a total of 107.76 sqm
- Alley in the back garden, we have 4 alleys, 3xRBs and the main path to the marbles area:
- 3x0.45x4.80 + 0.4*(8.40+4.80) = 11.76 sqm
- Net garden plantable space 102.48-10.71 = 96.00 sqm
- Back area (omitting terrace & marbles area):
- Grass area 54.7 sqm (=8.4*(3*(1.2+0.45+(0.05*2)))+((8.4+4.8)*0.8) (main area +grass strip that goes to marbles area 80cm average)
06/05/20
|
Observations for charts on temperature vs TopUp(L) Some possible influential factors to review (quantitatively):
|
|
||||||||||||
Ideas and options
- Height storage (using space for vertical space, hanging, shelves)
- Folding tables & workbench
- Decking, slabs etc..
- Rounded slabs around marbles ring and slabbing the whole front marbles area

27/09/19
Lessons on tomatoes from DaveG, LauraD & Internet
- Remove lower leaves from mid-July or when tomatoes appear (to allow Sun/heat to penetrate)
- Remove more leaves as season ends to allow for more sun/heat: DaveG explains that as your remove leaves, the plant stresses ut and rapidly aim to ripen the fruit (to seed)
- Allow for ~4 trusses (outdoor) and 5-6 in greenhouse/polytunnels - then cut from there on
- it's time to get a few inside (with the stem), in a sunny place, on a terracotta plate (or similar, no metal). Ideally take inside those that are big, not too green (i.e. they show a slight change in color towards yellow or orange). I usually get more and more tomatoes inside the house as it gets colder outside, and let them ripen under the sun indoors. When the first start maturing, they help the new ones mature, and so on.
- You put tomatoes near (bananas, apples, mangos, avocados), or ripened tomatoes to help the ripening process (these fruits release Ethylene C2H4) to help.
- You can put them in a transparent plastic bag (with Ethylene emitting fruits), make holes in the bag to speed up the process by windowsill. The temperature (more than the light) ripen the tomatoes, also helped by the Ethylene.
-
21/10/22 Soil lifecycle & management
- Explicit review and planning/execution/operations
- What we have in terms of ingredients
-
Finished Compost
A total of 10,009L over past decade
Finished home compost (taken 12/05/21)
Finished compost sieved to different grades for different purposes
Finished compost (called Grade III) is partly sieved to two granular sizes:
- Grade II (½inch, 12 mm sieve)
- Grade I (7mm sieve)
- Sieved Residue (SR) material
Below: Finished compost sieved into different buckets to Grade II and SR.
Grade III compost is used directly on soil for seedlings, raised beds and large pots
→
Grade II: For outdoor seed planting, small pots
Grade I: For seed tray planting and indoor pots
> Grade I is usually sieved on demand
Sieved Residue (from 12mm garden sieve)
For mulching, large pots top or bottom layer or addition back to input waste for another cycle
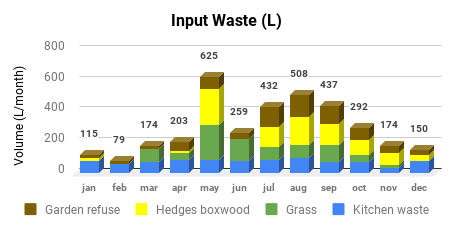
Input Waste
Input Waste annual timeline over the decade. We got more compost bins over the years and more material from other sources to process too (friends, neighbours etc.)
Input Waste breakdown roughly in quarters - with garden waste making up the ¾ , dominated by grass & hedge trimming material (boxwood)
A total of 30,523L Input Waste over the past 10 years.
On the right, breakdown per type on a monthly basis. Over the Spring & Summer season, the garden waste becomes dominant.
We collect ~3000L Autumn Leaves annually around Nov-Dec to make the brown part (carbon) of the Input Waste mix
An example of the green (nitrogen) part; mix of grass, kitchen waste and garden refuse (shredded)
Bin Cycles
Average bin cycle finishes in 7 months 19 days.
48 bin cycles completed in the decade.
3 bin cycles in current operation.
A complete bin cycle goes through 4 phases:
- Active: Multiple Top ups of Input Waste
- Cooling: Decomposition (no more top-up); gets to ready-to-use compost material
- Maturing: Additional time for further decomposition or if no space/time to empty the bin
- Empty/Available: Bin available for next cycle
Hot and Cold Composting
The pie chart shows the % of (total) Input Waste volume that was decomposed under different heating regimes - during their first two weeks (meso & thermophilic stages).
Nearly 50% of the ~30,000L Input Waste was in Active mode (40-55℃) and 20% in Hot composting (55-70℃).
A compost thermometer on the right: Compost Bin E (cycle 41), temperature 66℃ on 04/05/20. 117L were added on 02/05/20 (on top of an existing 318L volume), and the temperature reached 66℃ 2 days later.


